Lots of folks are afraid of water.
It’s called aquaphobia and it can be paralyzing for those who suffer from it.
Whether you’re comfortable in swimming pools but not in natural bodies of water or you enjoy every possible environment for swimming, each of us has a different level of confidence in and around the water. Some environments are riskier than others so even experienced swimmers can have some anxiety in certain swimming situations.
First, let’s look at what can cause people to be afraid of water. Their fear can be:
- An instinctive fear related to the fear of drowning.
- Caused by the fear of the unknown, or of what might be lurking below the surface in deep, cloudy or muddy waters.
- Related to a bad experience from childhood.
- Learning behavior transferred from their parents who were afraid of water.
- Ingrained by those using inadequate and/or stressful methods to teach swimming.
These folks are not defenseless! There are a few basic exercises in the water to help them overcome their fear.
Just a few details that will make you feel safer in doing these exercises:
- There is no need for the water to go higher than your chest.
- Doing the exercises in a swimming pool with clean water is best because you can see what is in the water.
- Wear swimming goggles while doing the exercises so water won’t get in your eyes and you will be able to keep them open all the time.
- Have someone who is an experienced swimmer and comfortable around water at your side that can help to support you during the exercises.
- If you can’t get help from an experienced swimmer it is recommended that these exercises be done in a swimming pool supervised by a lifeguard at a time when the pool isn’t crowded.
- Take baby steps. There is quite a list of exercises that are meant to take place in at least two stages. So don’t rush and feel as though you have to do all of these exercises at once. Stage them out in a way that is comfortable for you. You will make better progress if you’re comfortable and relaxed with what you’re trying to accomplish each time you get into the pool.
Getting acclimated to the water.
Use the shallow end of the pool for this exercise.
- Sit across the pool edge and let your legs dangle in the water, sweeping back and forth. Take your time to enjoy the sensation of the water flowing around your legs.
- Scoop up water with your hands and apply it to your face, as if to wash it. This is to get used to having your face being in contact with water.
- Scoop up water with your hands again, hold your breath and then splash the water into your face. As you are wearing swim goggles, your eyes are protected and you can try to keep them open. As you are holding your breath and sitting upright, you should notice that the water can’t get into your nose and mouth. Enjoy the refreshing sensation of the water on your face.
- Slowly get into the water via the steps or ladder in the shallow area of the pool. Make sure that the water doesn’t get above your chest. Walk around for some time, staying in the shallow area of the pool. Enjoy the sensation of the water flowing around your body.
Submerging your head.
Stay in the shallow water to complete these exercises.
- Hold your breath. Slowly crouch down until your lips are just above the water surface. How does it feel? See if you can get comfortable with having the water so close to your lips. Then stand up.
- Hold your breath. Slowly crouch down (with mouth closed) and see if you can get your mouth under water, having the water surface being between your mouth and your nose. Notice that water can’t get into your mouth.
- After a while, notice that your nose is still above the water surface. If the water is calm and there are no waves, try to breathe through your nose while still having your mouth under water. Notice that you can breathe through your nose even though your mouth is under water. Then stand up. Repeat this often to get comfortable breathing with your nose being so close to the water surface.
- Hold your breath. Slowly crouch down until your mouth touches the water surface, then goes under water. Crouch some more until your nostrils touch the water surface. If possible, hold this position for a few seconds, then stand up to breathe.
(It is actually completely OK to have water touching your nostrils or even having some water getting into your nostrils. You just need to be holding your breath and your head is upright when this happens. Because of the way the nose connects with the head, water can’t rise high enough in your nose to get into sinuses in that position. It’s only when the water gets into the sinuses that it becomes unpleasant. In fact, once you’ll have become an experienced swimmer, you will have water flowing into and out of your nostrils each stroke cycle, without ever having water getting into your sinuses and with you barely noticing.) - Again hold your breath, then crouch down until your nose is under water, the water surface being between your nose and your eyes. Your ears should not be under water, so slightly tilt your head forward. Again, notice how some water gets into your nostrils, but at the same time notice that it doesn’t rise very high in your nose and that because of this it doesn’t hurt. Try to hold this position a few seconds, then stand up to breathe.
- Hold your breath. Slowly crouch down as before. Now tilt your head slightly backwards. Slowly move down until your nose and your ears are below the water surface but your eyes are still above the water surface. Because you are holding your breath no water can get into your mouth and only a little bit of water gets into your nose. Notice how water gets into your ears and your hearing becomes muffled. Again try to hold this position a few seconds before standing up.
(Some water will get into your ears and this is also OK because the water will be prevented from going further by the ear drum and will flow out of the ear as soon as you leave the water. So this can’t hurt you.) - Hold your breath. Now slowly crouch down and let the water cover your mouth, nose, ears and move further down up to the point where your eyes move below the water surface. As you are wearing swim goggles (hopefully good ones), water can’t get into your eyes. Try to hold this position a few seconds, then stand up again and breathe. Once you are comfortable with your eyes below the water surface and can keep your eyes open, take the time to observe this strange world below the water surface that opens up to you.
- Once you are comfortable doing the previous exercise, you can add up the ante a little bit and do a bobbing motion, where you rhythmically submerge and emerge your head. This will get you used to having your head being submerged regularly, which will be useful later on when learning how to swim the popular swimming strokes.
Learn to exhale in the water – Blow Bubbles!
Stay in the shallow water for this exercise too!
- Breathe in while standing in the shallow area of the pool and hold your breath. Then crouch down so that your mouth is below the water surface but your nose is still above the water surface. Slowly exhale through your mouth, blowing bubbles in the water. You will realize that as long as you do exhale, water can’t get into your mouth. The same is true if you do hold your breath. Stand up again to breathe in.
- Repeat the previous exercise but now crouch down so far that only your eyes are above the water surface while your nose and mouth are below the water surface. Keep your mouth shut and now slowly blow bubbles through your nose. Again you will notice that water can’t get into your nose as long as you hold your breath or exhale. Stand up to breathe.
- Repeat the previous exercise but now blow bubbles in the water through both your nose and mouth.
- Finally repeat the previous exercise but with your head completely under water.
By the time you’ve worked through these three categories of exercises, you’re probably feeling better about your experience in the water. These are really big steps in overcoming this fear.
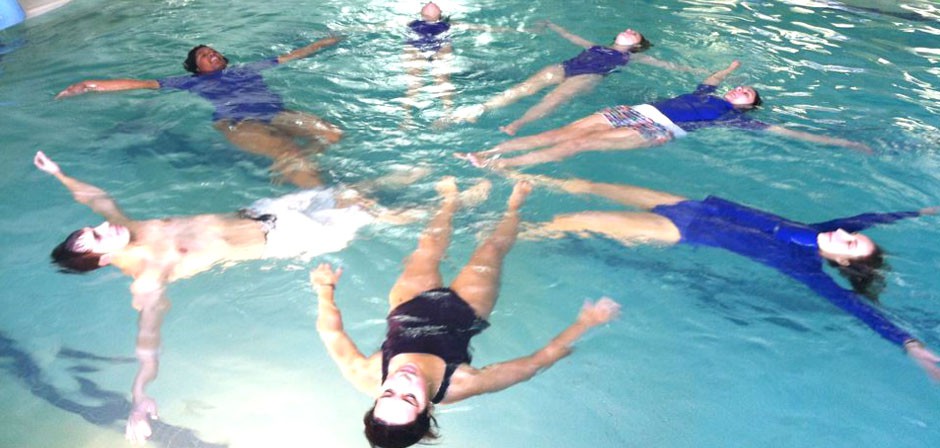
The human body actually floats very well. You can float pretty easily without even using your limbs!
Why? Your body is made of 60% water and is slightly less dense than water when you lungs are filled with air. Water will have a tendency to push you up to the surface because your body is less dense than the water itself.
Let’s do some floating exercises that will help you to get your body into the water.
Mushroom Float
This demonstrates your body’s natural ability to float.
- Stand in the shallow area of the pool.
- Take a deep breath and then hold your breath.
- Curl up into a ball by drawing your legs against your chest, and brace your legs with your arms.
- Your feet lose contact with the ground and you can float freely for a few seconds.
- When you need to breathe, unroll, put your feet on the ground, and stand up to get your head above the water.
You’ll notice that your head submerges but you float close to the water surface.
(You can also try to exhale while being curled up. You will see that your body starts to sink as your lungs get empty. This demonstrates that your lungs help your body to float for as long as they are filled with air.)
Once you have done this exercise a few times and feel how easy it is to be supported by the water, it should become easier for you to relax in the water and this should help reduce your fear of water.
Horizontal Float
This is a very important prerequisite to swimming because most swim strokes are done in this position.
- Go to the shallow area of the pool.
- Crouch down until the water is at the level of your chest.
- Extend your arms forward.
- Take a deep breath and then hold your breath.
- Slowly glide forward in the water, as if sliding forward on a bed made of water.
- Try to keep your head in a neutral position, in line with your spine. Because your body assumes a horizontal position, your face will actually be put underwater. But because you are holding your breath, the water can’t go up in your nostrils and you are perfectly safe.
- Slide forward until your body is completely extended.
- Now try to get comfortable in that position and to hold it for a few moments, until you need to breathe.
- Your position can be completely horizontal, floating freely and sticking to the water surface. Or maybe your position is tilted, with your upper body being supported by the water but your feet still touching the ground. Or somewhere in between. This depends on your body composition. Either is fine as long as you can relax and feel supported by the water for a few moments.
- To stand up, pull you knees towards your chest and move your arms downwards. Your torso will roll into an upright position with your feet beneath your torso. Then extend your legs, touch the ground with your feet and stand upright.
Gliding in a Horizontal Position
- In the shallow area of the pool, turn your back towards the pool wall.
- Inhale, hold your breath, then draw your legs up towards your chest like you did in Mushroom Float.
- Don’t brace your legs with your arms however. Extend your arms forward instead, and extend your legs backward at the same time to quickly push against the vertical wall of the pool.
- Extend your body and try to get as horizontal as possible. Keep your head in line with your trunk and try to glide as far as possible.
- Eventually the forward momentum will stop. Your legs may also drop at the end of the glide.
- To stand up and the end of the glide, do as before: draw your legs towards your chest, roll down, extend and touch the ground with your feet.
- Repeat this exercise a few times, until you feel well balanced and horizontal during the glide. Notice that no water gets into your nose as long as you hold your breath even though you are floating in a horizontal position.
To make this a little more fun, try to slowly exhale during the glide and/or to flutter kick to make you glide further.
Towing
Your support person will need to help you with this.
- Get into the horizontal position with your arms extended forward but don’t push off the wall.
- Let your support person grab one of your hands and gently tow you forward.
- Notice that it doesn’t take much forward movement for you to float in a horizontal position, as long as you keep your body straight and stay relaxed at the same time.
- Your support person can even release your hand once you have gained some forward momentum. You should still float and move forward a few moments until the momentum stops.
After working through the float exercises, you are probably feeling pretty good in the water! Continue your exercises – as you will probably continue to get more and more comfortable as you spend more time in the water. You’ll gain confidence in your ability to navigate in the water and be safe doing so.
Little Otter Swim Schools’ expertise and passion for teaching swimming to children makes the two locations of the schools the perfect places for children to learn to swim. www.littleotterswim.com
Resource: www.enjoy-swimming.com

Conversations